Beautiful Life

This tutorial was written by me on March 20th, 2019 and is my own creation. Any resemblance to any other tutorial is purely coincidental and unintentional.

PSP Version used: PSP 2019

This tutorial assumes you have a good working knowledge of PSP.

Supplies:

Tube of choice. I am using an older tube by Alexandra Vanhek. You can purchase it here.

FTU mini kit from Raspberry Road Designs.

You can find it here.

Mask 852 by me. You can find it here.

Font of choice. I am using Matsury.


Open element 27. Resize by 47%. Resize again, this time all layers unchecked by 65%.

Open your mask & paper 5. Resize your paper by 17%. Paste your paper as a new layer onto your frame canvas. Move below the frame layer, then apply your mask, merge group.

Open paper 3. Resize by 17%. Copy your paper.

On your frame canvas, click on the frame layer. Now with your magic wand tool, click inside the frame. Selections, modify, expland by 10. Paste your paper as a new layer, selections, invert & press delete. Deselect & move the paper below the frame layer.

Now let’s add our elements:

9 – resize by 25%. Paste as a new layer above the frame layer. Place to the upper right corner of the frame.
19 – resize by 20%. Place over the knot of the yellow ribbon.
7 – resize by 15%. Place over the bottom section of the frame.
17 – resize by 20%. Place over the yellow lace.
1 – resize by 30%. Place just above the yellow lace, and a bit to the right on the bottom.
22 – resize by 20%. Place to the top left corner of the word strip.
5 – resize by 25%, rotate right. Place over the black berry branch.
11 – resize by 11%, rotate right. Place over the center of the left side of the frame.
20 – resize by 20%. Place over the center of the outer left edge of the frame. Duplicate & place down & a little to the left of the button.
23 – resize by 20%.Place to the bottom, a little to the right of the center point.
21 – resize by 20%. Place to the bottom, directly below the ‘LIFE’ text.
13 – resize by 15%. Place over the left side of the frame opening.
24 – resize by 20%. Place to the bottom left corner.

Duplicate the white flower layer & move to the top layer. Place to the left of the blue flower.

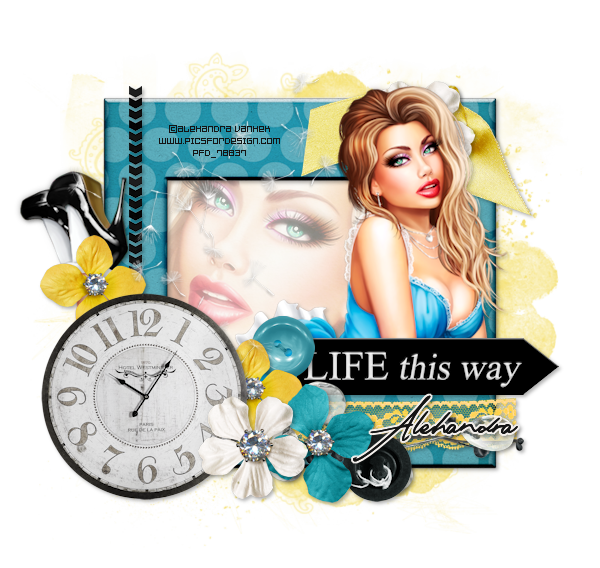
Make any adjustments to your elements, using my tag as a reference.

Open your tube. Paste as a new layer above the white paper layer. Flip horizontal & place your tube over the left side of the frame opening. On your white paper layer, select all, float, defloat. On the tube layer, selections, invert & press delete. Deselect. Duplicate your tube, gaussian blur 3.00. Set the blend mode to soft light. On the original tube layer, lower the opacity to 25.

Paste your tube again, this time just above the original white flower layer, resizing your tube as necessary. With your eraser tool, remove any part of your tube that extends below the word strip layer. Duplicate your tube, gaussian blur using the same settings as before. Set the blend mode to Overlay, 36.

Add your name, copyright, & license info. Apply a drop shadow of choice to your layers, then merge visible. Save as a PNG.

Thanks for checking out my tutorials.

Odds & Bits

This tutorial was written by me on February 5th, 2019 and is my own creation. Any resemblance to any other tutorial is purely coincidental and unintentional.

PSP Version used: PSP 2019

This tutorial assumes you have a good working knowledge of PSP.

Supplies:

Tube of choice. I am using the art of Nocturne. You can purchase her tubes here.

Odds and Bits freebie kit from Dhariana Scraps. You cand find it here.

Mask 846 by me. You can find it here.

Font of choice. I am using Halimun.


Open a new blank image, 600 x 600 px.

Open your mask & pp 3. Resize the paper by 17%. Paste as a new layer onto your blank canvas. Apply your mask, merge group.

Open el 25. Resize by 25%. Place to the top.

Open el 33. Resize by 34%. Paste as a new layer. Rotate slightly to the left. Move slightly to the right.

Open el 11. Resize by 35%. Place over the previous element.

Open el 9. Resize by 31%. Place to the left side.

Open el 12. Resize by 25%. Place to the bottom, a little to the right.

Open el 27. Resize by 12%. Place to the upper left.

Open el 19. Resize by 20%, rotate right. Place slightly above the center point.

Open pp 5 & resize by 17%. Copy your paper.

On your frame layer, use your magic wand and click inside the frame. Selections, modify, expand by 5. Paste your paper as a new layer. Selections, invert & press delete. Deselect & move below the frame layer.

Open el 7. Resize by 12%, flip horizontal. Paste as a new layer above the frame layer. Place to the bottom right corner of the frame.

Open el 4. Resize by 15%. Place to the top left of the cream colored grungy layer, a little to the right.

Open el 6. Resize by 15%. Place to the top left of the frame.

Open el 3. Resize by 15%. Place between the two flowers we just added.

Open el 37. Resize by 20%. Place to the bottom of the cream grungy layer, a bit to the right.

Open your tube, resizing as necessary. Paste as a new layer just below the frame layer. Duplicate twice. Now arrange your tubes to your liking inside the frame opening. On the bottom two tubes, lower the opacity to your liking. Merge the bottom two tubes together. Now merge with the full opacity tube. On the paper layer below this, select all, float, defloat. On the merged tubes layer, selections, invert & press delete. Deselect.

Duplicate your tubes layer, gaussian blur 3.00. Set the blend mode to Screen. On the original merged layer, set the opacity to 75.

Add your name, copyright, & license info. Apply a drop shadow of choice to your layers. Merge visible & save as a PNG.

Thanks for checking out my tutorials.

Purple Rain

This tutorial was written by me on January 17th, 2019 and is my own creation. Any resemblance to any other tutorial is purely coincidental and unintentional.

PSP Version used: PSP 2019

This tutorial assumes you have a good working knowledge of PSP.

Supplies:

Tube of choice. I am using the art of VeryMany. You can purchase her tubes here.

FTU kit from Carita called Purple Rain. You can find it here.

Mask 843 by me. You can find it here.

Font of choice. I am using Rounder.


Open el5. Set the canvas size to 600 x 617. Resize by 75%, all layers unchecked.

Open your mask & pp6. Resize your paper by 75%. Paste your paper as a new layer onto your frame canvas. Move to the bottom layer. Apply your mask, merge group. Duplicate, then merge down. Adjust>add/remove noise> add noise, random, 12, monochrome checked.

Open pp5. Resize by 75% & copy.

On your frame layer, use your magic wand & click inside the frame. Selections, modify, expand by 10. Paste your paper as a new layer. Selections, invert & press delete. Deselect & move below the frame layer.

Now let’s add our elements:

el9 – resize by 60%. Paste as a new layer above the frame layer. Place to the upper left side of the frame. Duplicate, mirror horizontal.
el13 – resize by 75%, flip vertical. Place to the bottom left. Duplicate, mirror horizontal.
el2 – resize by 80%. Place to the bottom.
el14 – resize by 50%. Place towards the bottom left, not quite all the way down.
el17 – resize by 60%. Place to the bottom left, over the circular ribbon.
el24 – paste as a new layer. Place to the bottom right. Duplicate, mirror horizontal.
el25 – resize by 50%, flip vertical. Place to the bottom right, to the outer edge of the frame. Free rotate a little to the right.
el22 – resize by 50%. Place to the bottom.
el15 – resize by 40%. Place to the left side of the bow. Move below the bow layer. Duplicate, mirror horizontal.
el18 – resize by 40%. Place to the bottom left of the boot.
el7 – resize by 40%. Paste as a new layer above the key layer. Place to the left of the left hand purple flower. Duplicate, mirror horizontal.

Open your tube, resizing as necessary. Paste as a new layer above the lace layers. Place in the center of the frame. With your rectangle selection tool, create a selection around any part of the tool that hangs below the flowers. Press delete, then deselect.

Duplicate your tube, gaussian blur 3.00. Set the blend mode to Screen, 67.

Add your name, copyrights, & license info. Apply a drop shadow of choice to your layers. Merge visible, save as a PNG.

Thanks for checking out my tutorials.

Gift Of A New Year

ZM_GiftofaNewYear_Rachel

This tutorial was written by me on December 28th, 2018 and is my own creation. Any resemblance to any other tutorial is purely coincidental and unintentional.

PSP Version used: PSP 2019

This tutorial assumes you have a good working knowledge of PSP.

Supplies:

Tube of choice. I am using the art of Zlata M. This tube was a quest tube. Please use a different tube if you did not earn this tube. You can find more of her tubes here.

FTU kit from Tiny Turtle Designs called 2018. You can find it here.

ttd-2018kit

Mask 4 Christmas 2010 by Vix. You can find it here.

Font of choice. I am using Frosting For Breakfast.

——————————————————————————-

Open element 22. This will be our working canvas.

Open your mask & paper 10. Resize your paper by 75%. Paste your paper as a new layer onto your working canvas. Move below the frame layer. Apply your mask, merge group. Add noise, gaussian, 25, monochrome checked.

Open element 17. Resize by 90%. Paste as a new layer above the mask layer.

On your frame layer, use your magic wand and click inside the frame. Selections, modify, expand by 10. Open paper 8 & resize by 75%. Paste as a new layer onto your working canvas. Selections, invert & press delete. Deselect & move the paper below the frame layer.

Now let’s add our remaining elements, which will all go above the frame layer:

54 – resize by 60%. Place to the top of the frame.
46 – resize by 50%. Place to the top right corner of the frame.
19 – resize by 35%. Place over the gold ribbon.
49 – resize by 50%, flip horizontal. Place to the bottom right.
35 – resize by 30%. Place to the top of the gifts, a little to the left.
55 – resize by 80%. Place to the bottom.
62 – resize by 80%. Paste as a new layer.
41 – resize by 40%. Place to the bottom.
77 – resize by 30%. Place to the bottom left.
60 – resize by 40%. Place to the bottom, along the right side of the cupcake.

Duplicate the pink poinsetta. Move above the gifts layer & place to the left of the blue center cluster at the bottom. Duplicate, mirror horizontal.

Open your tube, resizing as necessary. Paste as a new layer above the original poinsetta layer. Place so the tube is centered over the frame. Erase any part of the tube that extends below the bottom of the rest of the tag.

Add your name, copyright, & license info. Apply a drop shadow of choice to your layers, then merge visible. Save as a PNG.

Thanks for checking out my tutorials.

Halloween Candies

AR_HalloweenCandies_Rachel

This tutorial was written by me on October 28th, 2018 and is my own creation. Any resemblance to any other tutorial is purely coincidental and unintentional.

PS Version used: PS CS3

This tutorial assumes you have a good working knowledge of PS.

Supplies:

Tube of choice. I am using the art of Alec Rud. You can purchase his tubes here.

2018 Blog Train Freebie kit called Halloween Candies from Bibi’s Collection. You can grab it here.

Mask 40 from Tonya’s Temptations. You can find it here.

Font of choice. I am using Peas & Carrots.

If you are unsure of how to apply a mask in PS, follow the instructions here.

For resizing, you will need to use my image as a reference.

——————————————————————————-

Open a new blank image, 600 x 600 px.

Open your mask & PAPER 1. Resize both your paper & mask to the size of your blank canvas. Paste your paper as a new layer onto your blank canvas. Now apply your mask, then convert to smart object & then rasterize this layer.

Open ELEMS 83. Paste as a new layer. Using your move tool, click on ‘show transform controls’ on your move toolbar to make sure it is activated. Find the top left corner of the frame. Do this by moving your frame to the bottom right. Once found, press shift while dragging the top left corner down & to the right. You may have to do this more than once. Just remember to keep moving the frame towards the center before each resizing. Once satisfied with the size, press ctrl+a. Then at the top press the second icon (center vertical), and then the 5th icon (center horizontal).

With your magic wand tool, click inside the frame. Select, modify, expand by 10.

Open PAPER 4. Resize to 600 x 600. Paste as a new layer. Select, inverse, then press delete. Deselect & move this layer below the frame layer.

Now let’s add our remaining elements:

98 – paste as a new layer above your frame layer, then resize. Place towards the top of the frame.
90 – paste as a new layer, then resize. Place to the bottom of the frame.
28 – paste as a new layer, then resize. Place to the right side of the fabric. Duplicate, then place to the left side of the fabric.
56 – paste as a new layer, then resize. Place to the bottom left corner of the frame.
82 – paste as a new layer, then resize. Place towards the top of the frame.
55 – paste as a new layer, then resize. Place to the bottom right, a little in from the left.
1 – paste as a new layer, then resize. Place to the bottom left, a little in to the right.
14 – paste as a new layer, then resize. Place to the bottom of the candy scatter.
51 – paste as a new layer, then resize. Place to the bottom right.
41 – flip horizontal, then paste as a new layer. Resize, then place to the top left, on the web.
95 – paste as a new layer, then resize. Place to the bottom.
6 – paste as a new layer, then resize. Place to the bottom right of the cauldron.
5 – paste as a new layer, then resize. Place to the bottom left of the cupcake.
50 – paste as a new layer, then resize to slightly larger than your frame.

Open your tube. Paste as a new layer above the green paper layer, resizing slightly. Place over the left side of your green paper. Ctrl_click on the green paper layer. On the tube layer, select, inverse & press delete. Deselect. Duplicate your tube layer, then filter, blur, 3.00. Set the blend mode to screen, 38. On the original tube layer, lower the opacity to 23.

Paste your tube again, but this time above the string layer, then resize. Place over the right side of your frame. With your rectangular marquee tool, create a box around any part of the tube that hangs below the cauldron. Press delete, deselect.

Add your name, copyright, & license info.

Apply a drop shadow of choice, then merge visible. Save as a PNG.

Thanks for checking out my tutorials.

Monsters

TTD_Halloween_Rachel

This tutorial was written by me on October 6th, 2018 and is my own creation. Any resemblance to any other tutorial is purely coincidental and unintentional.

PSP Version used: PSP X5

This tutorial assumes you have a good working knowledge of PSP.

Supplies:

FTU kit from Tiny Turtle Designs. You can find it here.

ttd-2018halloweenfreebiekit

Halloween Mask 0905 by Vix. You can find it here.

Font of choice. I am using bhatoshine.

———————————————————-

Open a new blank image, 600 x 500.

Open paper 9 & your mask. Resize your paper by 75%. Paste onto your blank canvas. Apply your mask, merge group.

Open element 67. Resize by 50%. Paste as a new layer.

Now let’s add our remaining elements:

74 – resize by 80%. Paste as a new layer above the mask layer. Place to the top.
63 – resize by 40%. Place towards the top & to the left of the sign.
11 – resize by 60%; rotate right. Place to the bottom right.
13 – resize by 40%. Place to the bottom right over the leaves, but a little behind the sign.
64 – resize by 40%. Paste as a new layer above the sign layer. Place to the bottom left side of the sign.
37 – resize by 30%. Place just above the sign, to the right side. Rotate a little to the right.
73 – resize by 30%. Place to the bottom, a little to the left. Duplicate & place a little to the right of the center.
39 – resize by 25%. Place to the bottom right of the sign.
72 – resize by 25%. Place to the bottom, between the two roses.
76 – paste as a new layer.

Add your name & credits. Apply a drop shadow of choice, then merge visible. Save as a PNG.

Thanks for checking out my tutorials.

Skulls N Bones

Z_SkullsNBones_Zebrush

This tutorial was written by me on September 30th, 2018 and is my own creation. Any resemblance to any other tutorial is purely coincidental and unintentional.

PSP Version used: PSP 2018

This tutorial assumes you have a good working knowledge of PSP.

Supplies:

Tube of choice. I am using an exclusive from Zebrush. You can purchase it here.

FTU kit from TK Dezigns called Skulls N Bones. You can find it here.

folder

Mask 784 by me. You can find it here.

Font of choice. I am using Gas.

Open frame 5. Set the canvas size to 600 x 600. Manually place the frame so it looks more centered over your canvas.

Open your mask & paper 4. On your paper, resize by 86%. Paste as a new layer onto the frame canvas. Move your paper below the frame layer. Apply your mask, merge group.

Open paper 9 & resize by 86%. With your magic wand tool, on your frame layer click inside each frame. Selections, modify, expand by 10. Paste paper 9 as a new layer. Selections, invert & press delete. Deselect & move your paper layer below the frame layer.

Now let’s add our elements:

element12b – Rotate to the right. Repeat. Paste above the frame layer. Place to the upper right corner of the top left frame.
element9 – resize by 90%. Paste as a new layer.
element16 – paste as a new layer.
element 11 – resize by 60%. Place on top of the large black skull so it looks like it’s wearing the tiara.
element25 – resize by 50%. Place to the bottom left corner of the bottom frame.
element22 – resize by 60%. Place to the upper left of the first flower. Move below the pink flower layer. Duplicate & place to the bottom right of the pink flower.

Open your tube. Paste as a new layer above the paper layer (below the frame layer). Resize as necessary & place behind the top left frame. When you’re satisfied, on your frame layer use your magic wand & click inside the frame. On the tube layer, selections, invert & press delete. Deselect. Repeat for the bottom frame using a different part of the tube.

Merge the tube layers together. Duplicate, gaussian blur 3.00. Set the blend mode to screen, 80. On the original tube layer, set the blend mode to hard light, 45.

Add your name, copyrights, & license info. Apply a drop shadow of choice, then merge visible. Save as a PNG.

Thanks for checking out my tutorials.

Little Everyday Moments

AP_LittleEverydayMoments_Rachel

This tutorial was written by me on August 6th, 2018 and is my own creation. Any resemblance to any other tutorial is purely coincidental and unintentional.

PSP Version used: PSP 2018

This tutorial assumes you have a good working knowledge of PSP.

Supplies:

Tube of choice. I am using the beautiful art of Alex Prihodko. You can purchase this tube here.

FTU kit from Kristin Cronin-Barrow called Little Everyday Moments. You can find it here.

kcroninbarrow-littleeverydaymoments-preview

LNL 2016 Floral Mask 2 from Leather and Lace. You can find it here.

Scripty font of choice. I am using Syirenata.

———————————————————————————-

Open Frame 2. Set the canvas size to 1263 x 1263. Resize by 48%. Now resize again, this time all layers unchecked, by 70%. With your pick tool, rotate the frame slightly to the left.

Open your mask & pp4. Resize your paper by 17% & paste as a new layer onto your frame canvas. Move your paper below the frame layer. Apply your mask, merge group.

On your frame layer, use your magic wand & click inside the frame. Selections, modify, expand by 5. Open pp3 & resize by 17%. Paste as a new layer onto the working (frame) canvas. Selections, invert & press delete. Deselect & move below the frame layer.

Now let’s add our elements:

Clip – resize by 20%, rotate right. Paste as a new layer above the frame layer. Place to the top right side of the frame.

Foliage2 – resize by 15%. Place to the bottom left of the frame. Duplicate, free rotate to the right, 90. Place along the bottom of the frame.

Foliage – resize by 20%. Place over the white side foliage. Duplicate, free rotate to the right, 90. Place over the white bottom foliage.

A lifetime of memories – resize by 30%. Place to the bottom of the frame opening, with the element extending a little beyond the right edge of the frame. With your pick tool, rotate it so it is the same angle as your frame.

Confetti – resize by 25%. Paste as a new layer. Rotate slightly to the right & place to your liking.

Flower1 – resize by 15%. Place towards the bottom of the side foliage. Duplicate & place to the bottom, a little to the right.

Flower2 – resize by 15%. Place to the bottom right of the flower on the side. Duplicate & place to the bottom of the same blue flower, slightly to the left.

Label – resize by 15%. Place in the center of the blue & pink flowers. See my tag for reference.

Butterfly – resize by 20%, flip horizontal. Place along the right edge of the frame, sit atop the ‘memories’ quote.

Open your tube, resizing as necessary. Paste as a new layer just above the clip layer. Mirror your tube & place over the frame. With your freehand selection tool, select the bottom part of the tube below the ‘memories’ quote. Press delete, then deselect. Duplicate, gaussian blur 3.00. Set the blend mode to Soft Light.

Add your name, copyright, & license info. Apply a drop shadow of choice to your layers, then merge visible. Save as a PNG.

Thanks for checking out my tutorials.

It Must Bee Love

SF_ItMustBeeLove_Shani

This tutorial was written by me on May 17th, 2018 and is my own creation. Any resemblance to any other tutorial is purely coincidental and unintentional.

PSP Version used: PSP 2018

This tutorial assumes you have a good working knowledge of PSP.

Supplies:

Tube of choice. I am using the art of StellaFelice7. You can purchase her tubes here.

FTU kit from Wicked Princess Scraps called It Must Bee Love. You can find it here.

WP_ITMUSTBEELOVE_PREVIEW

Mask 172 from Insatiable Dreams. You can find it here.

Template 837 from Millie’s PSP Madness. You can find it here.

Font of choice. I am using Malina.

———————————————————————————-

Open your template. Delete the top layer. Set the canvas size to 800 x 591. Resize by 75%.

Merge together the following layers: 4 & 5; 8 & 9

Replace each layer with the following:

Note: Resize each paper by 75% before applying to your layer.

1 – PP4
2 – PP10
3 – PP1
4 – set your foreground to #f9f6f4 & your background to #f2c744. Set the foreground to the fore/back linear gradient, angle 315, repeats 3. On this layer, select all, float, defloat. Add a new raster layer & floodfill with your gradient. Deselect & delete the original merged layer.

Effects, artistic effects, halftone using the following settings:

ItMustBeeLoveHalftone

6 – PP2, add noise, random, 30, monochrome checked.
7 – PP7
8- set your background to #99b02c. Repeat the steps used for layer 4, but for the gradient change the angle to 45. Also repeat the halftone.
10 – PP8

Open your mask & HONEYCOMB2. Paste the honeycomb as a new layer above the background layer. Rotate by 45 degrees to the left or right, doesn’t matter. Apply your mask, merge group.

Now let’s add our elements:

TREE2 – resize by 65%. Paste above the top layer. Place over the left side of the template.
HONEYCOMB1 – resize by 50%. Place to the bottom of the tree.
BEE3 – resize by 40%. Place to the top left of the top paper layer.
HIVE2 – resize by 40%. Place to the bottom right.
HEART1 – resize by 40%. Place to the bottom left. Rotate slightly to the left. Duplicate, flip horizontal & place to the upper right corner of the yellow paper layer.
FLOWER1 – resize by 30%. Place to the bottom left of the top right heart. Duplicate & place to the bottom right of the bottom left heart.
BEE5 – resize by 30%. Place just above the hive.
BUTTERFLY1 – resize by 25%, flip horizontal. Place to the upper right of the bottom left flower. Rotate slightly to the left.
FLOWER5 – resize by 50%. Place to the bottom, a little to the right.

Open your tube, resizing as necessary. Paste as a new layer & place to your liking.

Add your name, copyright, & license info. Apply a drop shadow of choice to your layers, then merge visible. Save as a PNG.

Thanks for checking out my tutorials.

Little Somethings

VM_LittleSomethings_Rachel

This tutorial was written by me on February 12th, 2018 and is my own creation. Any resemblance to any other tutorial is purely coincidental and unintentional.

PSP Version used: PSP 2018

This tutorial assumes you have a good working knowledge of PSP.

Supplies:

Tube of choice. I am using art of VeryMany. You can purchase this tube here.

FTU kit from Digi Designed by Wilma called Little Somethings 8. You can grab it here.

Freebie-LittleSomethings8-byWilma-Preview600

Mask 10 from HorsePlay’s Pasture. You can find it here.

Font of choice. I am using Pass The Chex.

Filters:

Mura Meister Copies

Xero Porcelain

———————————————————————————-

Open FrameRectPink. Set the canvas size to 1897 x 1897. Resize the frame, all layers unchecked, by 75%. Rotate slightly to the left. Resize all layers by 32%.

Open your mask & Paper08. Resize your paper by 30%. Paste as a new layer onto your frame canvas. Move below your frame layer. Apply your mask, merge group.

On your frame layer, use your magic wand and click inside the frame. Selections, modify, expand by 5.

Open Paper05. Resize by 17%. Paste the paper as a new layer onto your frame canvas. Selections, invert. Press delete, then deselect. Move below the frame layer.

Now let’s add our elements:

LeafGold – resize by 15%. Place to the bottom left of the frame. Rotate a tiny bit to the left.

RibbonPinkBlack – resize by 25%. Place to the upper right corner of the frame. Rotate a little to the right.

Flower4 – resize by 20%. Place to the bottom left corner of the frame.

Flower2 – resize by 18%. Place to the right of the pink flower.

StringLoveGold – resize by 15%. Place to the bottom.

HeartsClusterStaples – resize by 20%. Place to the bottom right.

Open your tube. Paste as a new layer above the bow layer, resizing as necessary. Place to your liking over the frame. With your rectangle selection tool, create a selection over the part of the tube that hangs below your tag. Press delete, deselect. Duplicate your tube & move just above the mask layer.

Mura Meister Copies, Wallpaper preset.

On the mask layer, select all, float, defloat. On the copies layer, selections, invert & press delete. Deselect.

On the original tube layer, apply Xero Porcelian, change the blue to 0.

For the text, type out the first letter of your name, convert to raster layer. Do this for each letter, messing with the placement of each. When you like the placement, merge the letters together and give it a gradient glow or background.

Apply a drop shadow of choice to your layers. Add your copyright & license info then merge visible. Save as a PNG.

Thanks for checking out my tutorials.